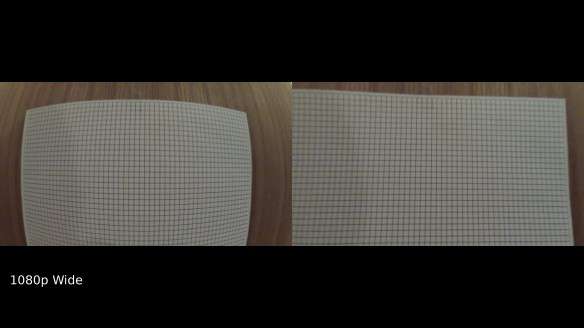
The GoPro Hero 2 is a great camera that can shoot beautiful video with a very wide angle. I find the fisheye effect pretty cool for videos with lots of activity with a person in the middle but on videos with landscapes the fisheye effect can bring some annoying distortions. The GoPro is my first camera, so I do not have any professional video editing software (and I do not want to buy one).
How to remove the fisheye effect of the GoPro Hero 2 with free software?
By using the free software Virtualdub with the plugin Barrel distortion correction, I got the following result:
And here is a video explaining how to use virtualdub with the plugin:
Step by step explanation
- download Virtualdub 32 bits (the plugin is not available for the 64-bit version)
- download the plugin pack containing the plugin Barrel Distortion Correction from Emiliano Ferrari
- Copy the vdf files from the plugin pack into the plugins folder of virtualdub
- Start virtualdub
- Open the video (the video must be in AVI to be opened in virtualdub, you can use GoPro CineForm Studio software supplied with the GoPro to convert video to AVI)
- Select Full processing mode in the video menu
- In the video menu, click on Filters …, and then add the filter Barrel Distortion
- Uncheck Aspect Ratio and put the following values according to the angle used to film the video:
wide
 alpha=-0.3
 beta=0.08
medium alpha=-0.16900 beta=0.03300narrow alpha=-0.082 beta=0.015
To determine the correct values, you first need to modify alpha (in the negative numbers) until the parts in the top center and bottom center are vertical, then you need to modify beta by going towards positive numbers until things are correctly horizontal. If you find better values, do not hesitate to send them to me.
- Then, as we are in the mode Full processing mode, you must choose a compression codec ( menu video, then compression). If you leave uncompressed expect to have videos of several gigabytes.
- Finally, you just have to save the video and wait for virtualdub to finish the job.


Thank you for the info. I have downloaded VirtualDub and the filter. I just got the GoPro Hero 3 Black Edition. The default file type is .avi. When I go to open the file in VirtualDub it says it can not use this file. Suggestions?
I don’t have a GoPro Hero 3 but I guess the problem is that virtualdub cannot open the codec of the new GoPro. A solution would be to convert the video using a more classic codec that virtualdub can read.
Pingback: New Go Pro Hero2 | Buffy Living
Pingback: gopro - Pagina 47
Pingback: how to remove "fisheye-effect"? - GoPro Forum, Classifieds and Support
Get the MPEG Streamclip. Its a great tool for converting vids. And its free =)
Thank you for your settings! I’ve been fiddling around trying to get the best settings for my GoProHero 3 Black Edition and your settings hit the sweet spot!
Hey, nice tutorial, but i´ve got a problem while trying the .vdf files from the archives downloaded from the plugin pack: In the folder of barrel distortion there are like 5 files but none of them has a .vdf domain.
I´ll be really happy if you could help
sebastián
Hey Sebastián,
From the link I put in the article, download the binaries full pack (the file is called All_Filters_Bin.zip) and this file should contains a good number of vdf files. Those files must be put in the plugins folder of VirtualDub.
There isn’t any specific folder for barrel distortion in that archive.
Let me know if it helps.
Hmm… keep in mind that this method leads to a loss of quality – 2 times, at least:
1) when converting to AVI (recompression 1)
2) when saving the corrected video (recompression 2)
But I believe that this is the only FREE way to fix the fisheye effect.
Went through this procedure with a 5GB AVI file and when I started saving it, although I had selected Compression, it predicted a 66GB output file. Any ideas what may be wrong here ?
After selection Compression, you need to select a Codec. The default codec may have been some uncompressed video format. If the codec list is very small on your computer, download a codec pack to have the classic ones like xvid.
Thanks for the great tutorial man 😀 Worked also great for the GoPro Hero 3!
Hi! Do you use Twitter? I’d like to follow you if that would be ok.
I’m definitely enjoying your blog and look forward to new posts.
Here is my blog post best beaches in florida
Hi
Thanks for the video but I have two questions
1) I don’t seem to have the vast number of compression codecs you have.
2) How do I crop the final video to look “normal”
Many thanks
Derek
Hi,
1) Just install classic codec packs (K-lite for example)
2) There is a filter for cropping
Hope that help
Thanks very much for your help, really appreciate it.
Regards
Derek
Thanks for the information and step-by-step tutorial. After a bit of fiddling, trying to create an AVI file that Windows 10 would read, and then finding the barrel distortion filter, I managed to clean up the dreadful distortion in the DJI Phantom Vision 2+ camera to produce a half-decent video.
Hi, thanks for this!
I’ve got Phantom 1 and SJ4000. After reading this I immediately went to experiment with the Alpha and Beta and these are pretty nice:
Alpha: -0.115
Beta: 0.011
I ended up using Alpha -0.1, Beta 0.007 in my first SJ4000 video correction. It seemed like a good compromise, not perfectly straight lines, but not wavy either. Maybe two parameters are not enough for all lenses. Unfortunately I cannot show this video, and my computer renders 1.5 frames/sec, so these things take time…